Before you connect
Meta controls the login, business selection, and approval checks inside embedded signup. Before you start, make sure you have a Facebook account. During the flow you can create a Meta Business Portfolio and WhatsApp Business Account (WABA) if you need. If you already have these created, make sure you have:- access to the correct Meta Business Portfolio
- access to the WhatsApp Business Account (WABA)
- complete business information in Meta, including legal name, address, business phone number, and a public HTTPS website
- no unresolved number-status or capacity issues in WhatsApp phone numbers
- no unresolved WABA status, business verification, billing, or payment prompts in WhatsApp account settings
- capacity in the selected Business Portfolio for another WhatsApp phone number
Connection options
| Option | Best for | Requirements |
|---|---|---|
| Instant setup | Get started immediately | Facebook account |
| WhatsApp Business App | Keep using the app alongside Kapso | Active WhatsApp Business App number and phone access |
| Bring your own SIM | Use your own phone number | Dedicated SIM card |
Instant setup (digital number)
Get a pre-verified US phone number without SMS verification. Before using this option:- use a Meta Business Portfolio that can add another WhatsApp phone number
- choose a Kapso-provided or BSP-provided number inside Meta
- watch the pre-signup guidance in Kapso if it appears, because it shows which Meta phone-number option to choose
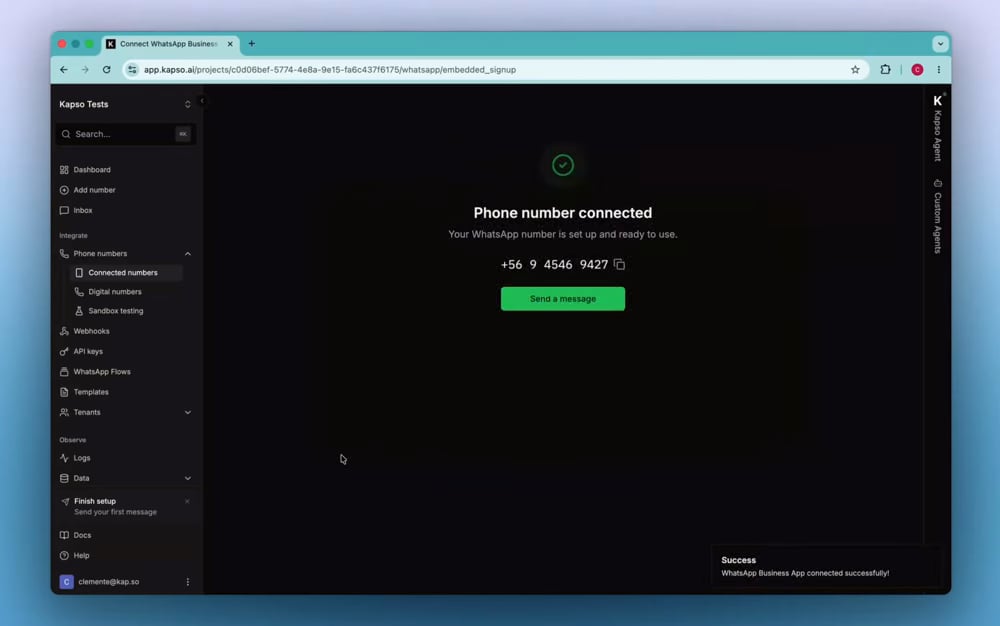
- Go to Connected numbers → Connect new number
- Select Instant setup
- Confirm the instruction that you should choose a Kapso-provided or BSP-provided number in Meta
- Watch the pre-signup guidance if Kapso shows it
- Click through to open Meta embedded signup
-
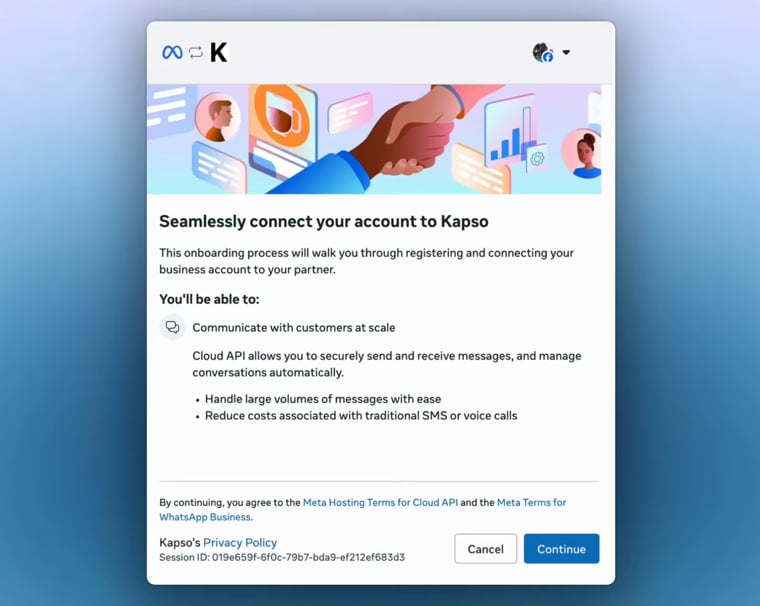
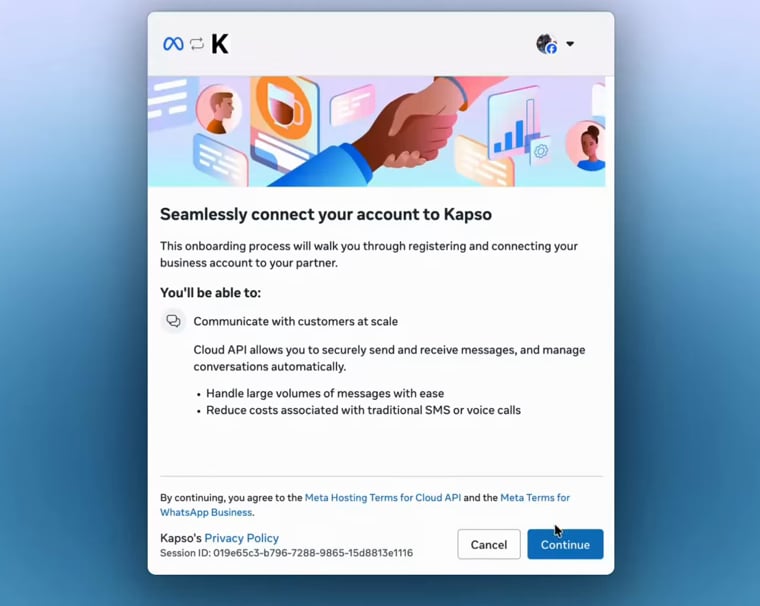
Log in with the Facebook account that has access to your business. On Seamlessly connect your account to Kapso, review what Kapso will be able to do and click Continue.

-
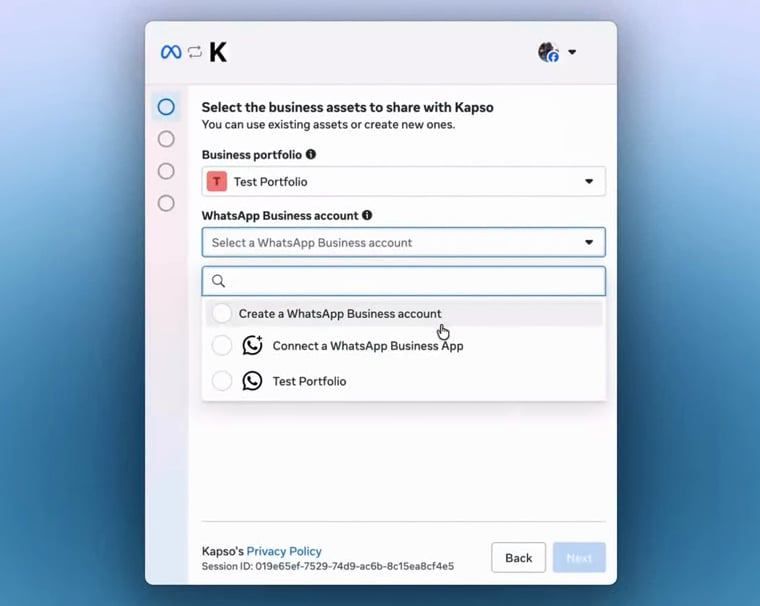
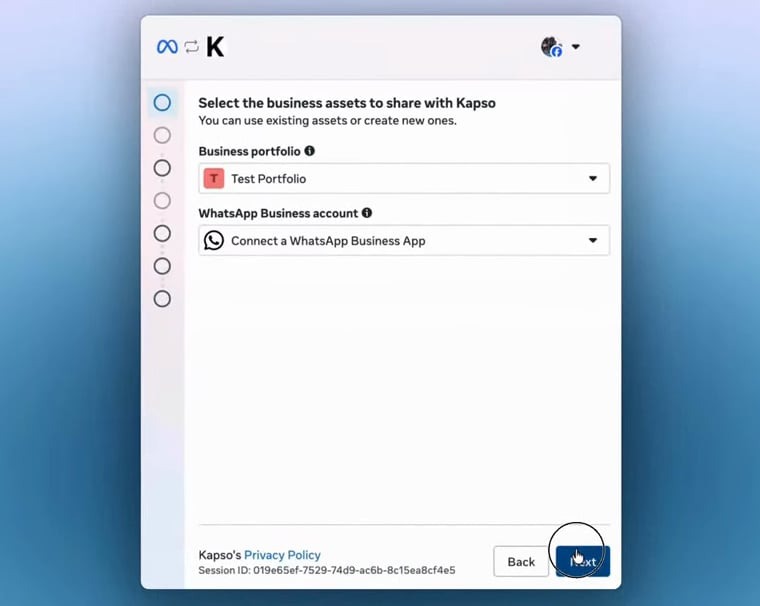
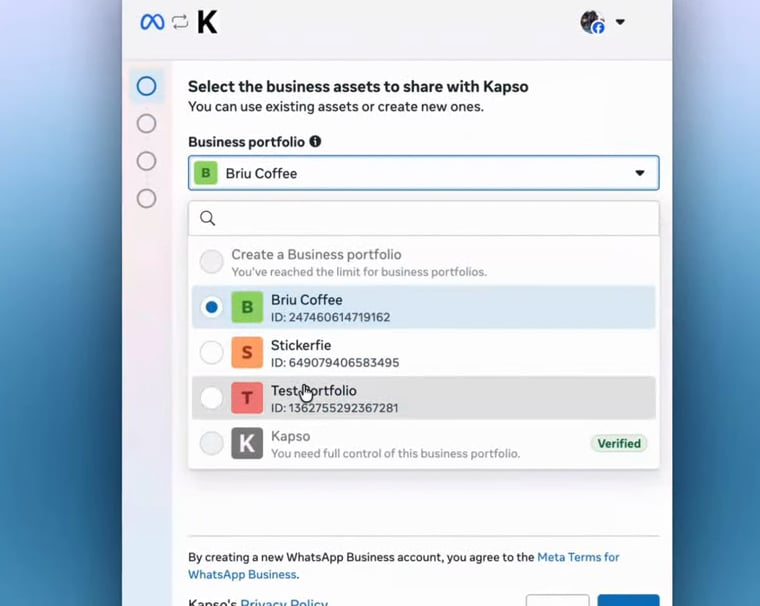
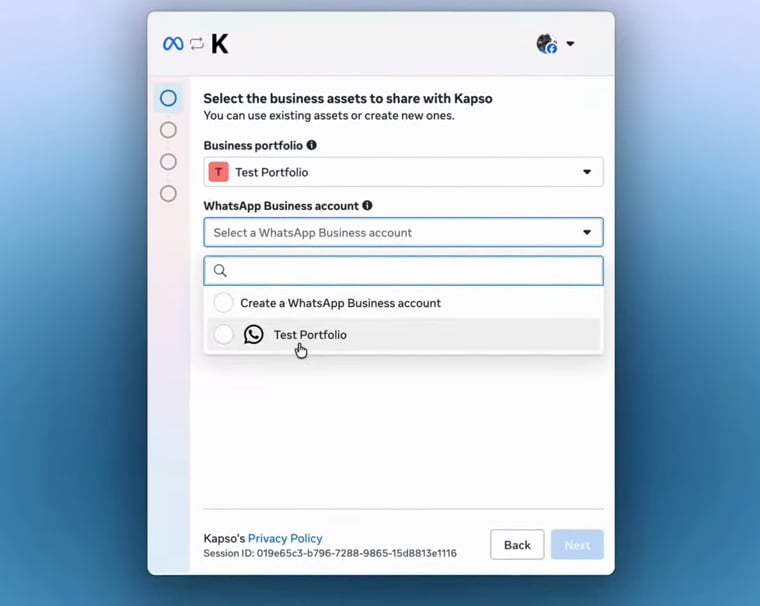
On Select the business assets to share with Kapso, choose the Business portfolio for the business you want to connect.
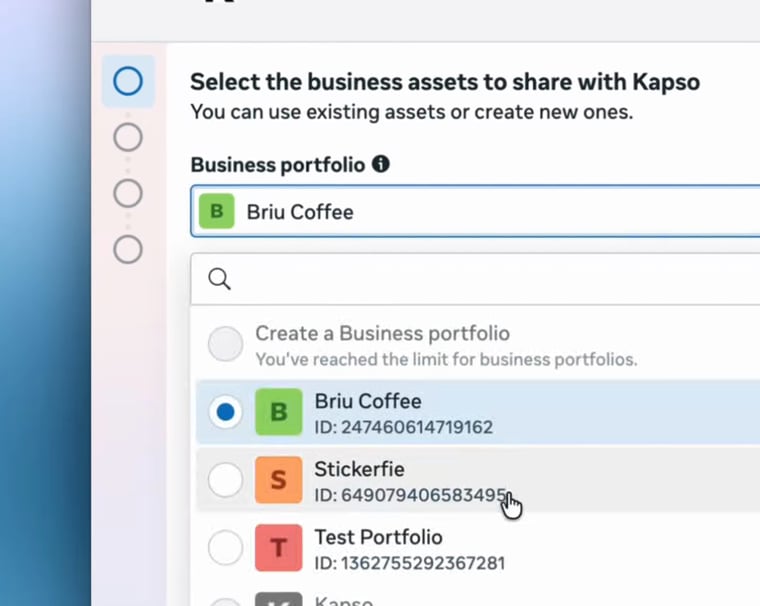
-
Choose an existing WhatsApp Business account, or create one if Meta asks you to.
-
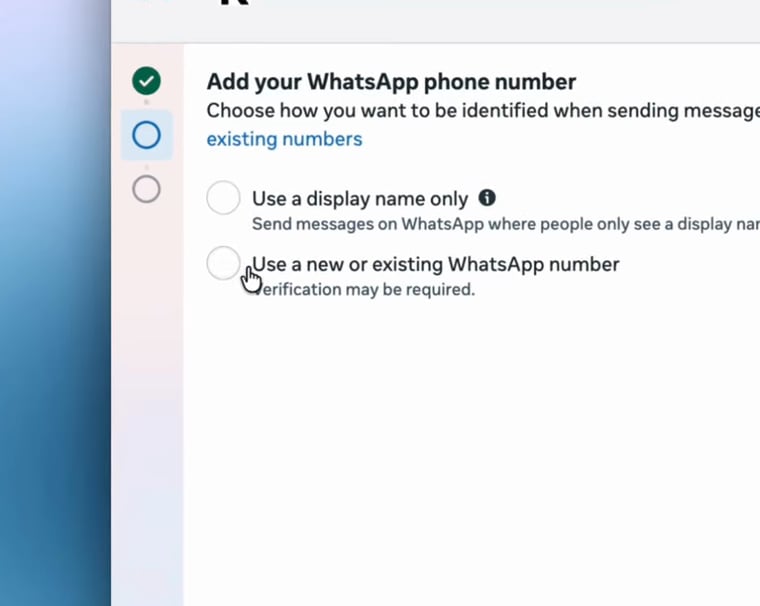
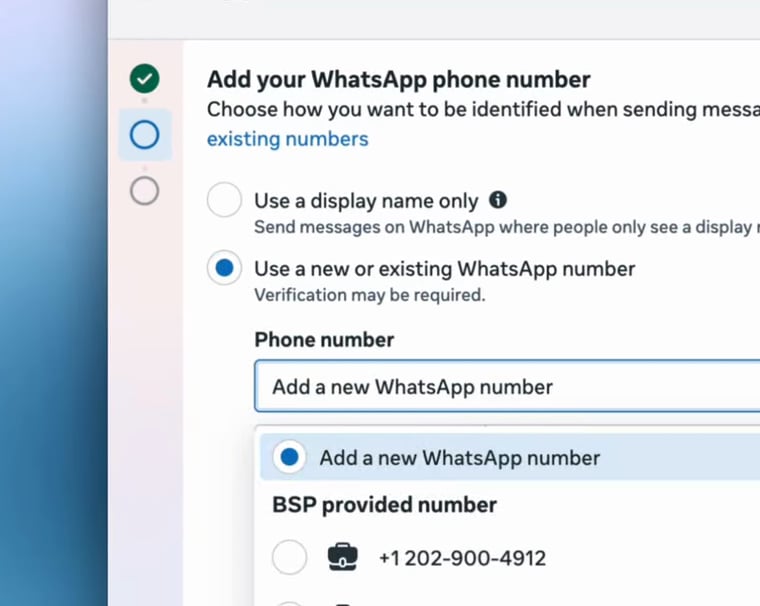
On Add your WhatsApp phone number, do not choose Use a display name only. Choose Use a new or existing WhatsApp number.
-
Open the Phone number dropdown, select a number under BSP provided number, and click Next.
-
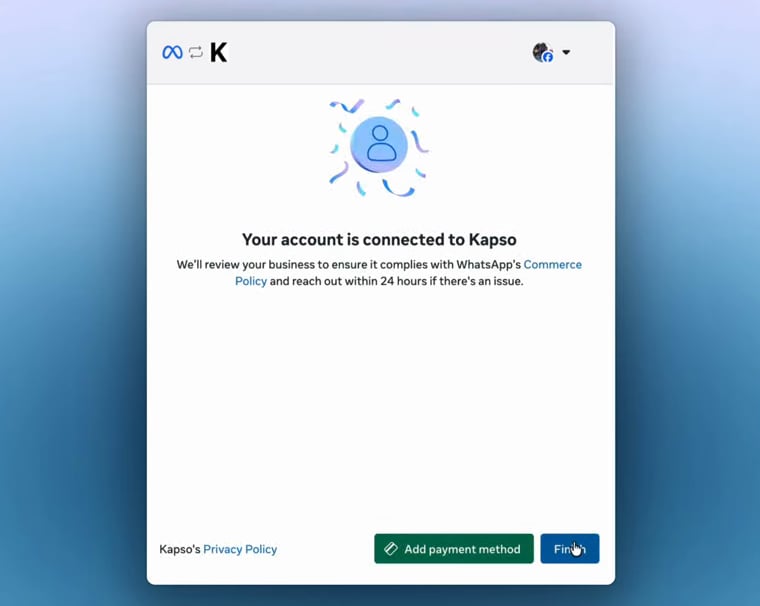
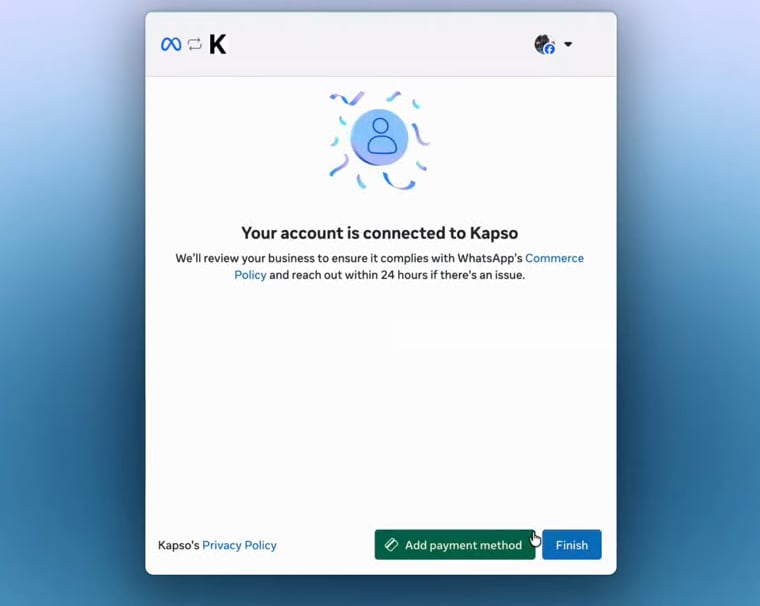
When Meta shows Your account is connected to Kapso, click Finish. This final step sends you back to Kapso so the connection can be completed.
WhatsApp Business App
Keep using the WhatsApp Business app on your phone alongside Kapso. Before using this option:- make sure the number is active in the WhatsApp Business App, not the personal WhatsApp app
- update the WhatsApp Business App and keep the phone nearby with a working camera
- disconnect old providers, partners, or stale WABA links before retrying a migrated number
- use the QR-based WhatsApp Business App path; if Meta sends you to SMS or voice verification, restart from Kapso and choose WhatsApp Business App
- Go to Connected numbers → Connect new number
- Select WhatsApp Business App
- Click through to open Meta embedded signup
-
Log in with the Facebook account that has access to your business. On Seamlessly connect your account to Kapso, review what Kapso will be able to do and click Continue.
-
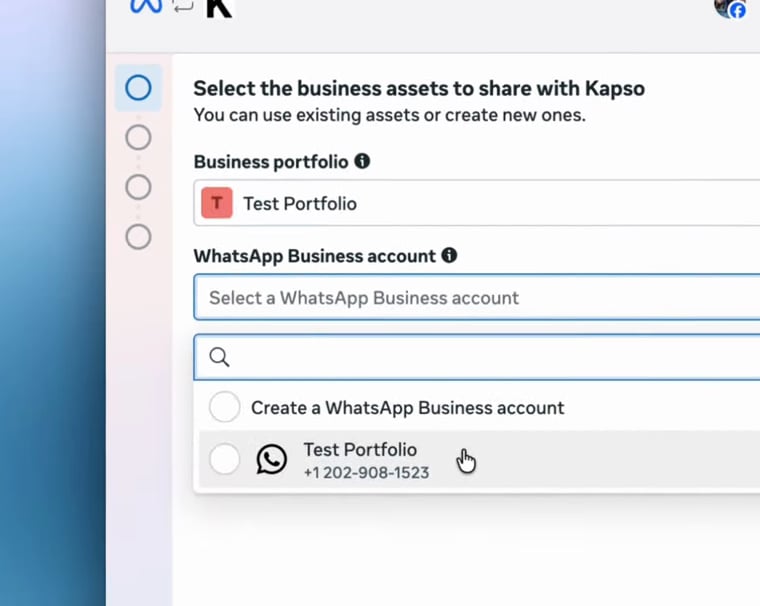
On Select the business assets to share with Kapso, choose the Business portfolio for the business that owns this WhatsApp number.
-
In WhatsApp Business account, choose Connect a WhatsApp Business App and click Next.
-
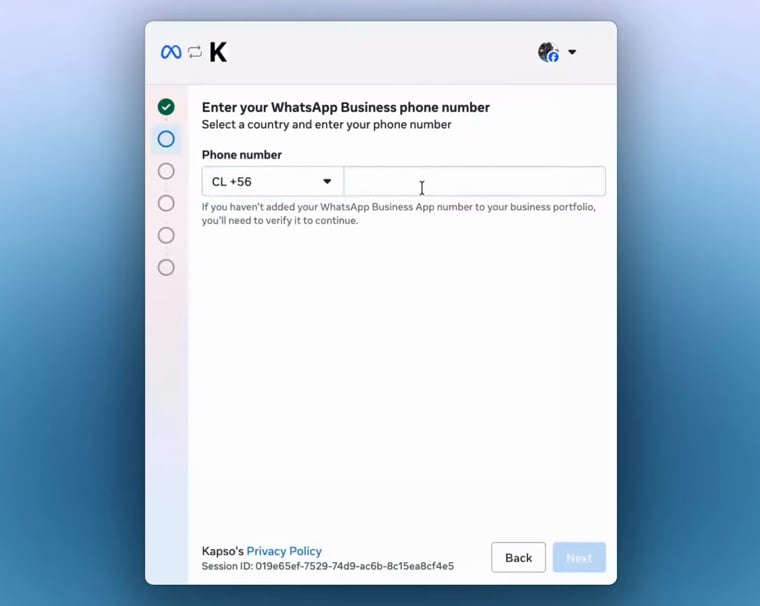
On Enter your WhatsApp Business phone number, select the country code, enter the phone number that is already active in your WhatsApp Business App, and click Next.
-
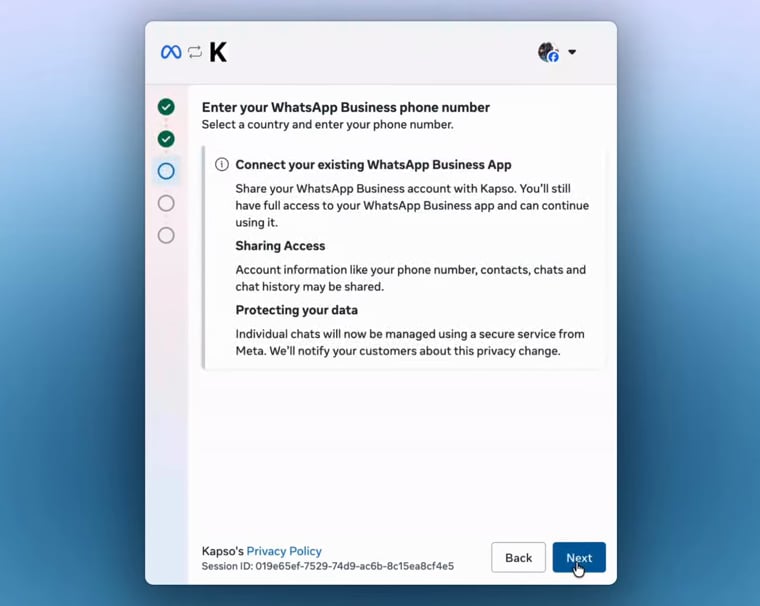
On Connect your existing WhatsApp Business App, review the sharing access and protection information, then click Next.
-
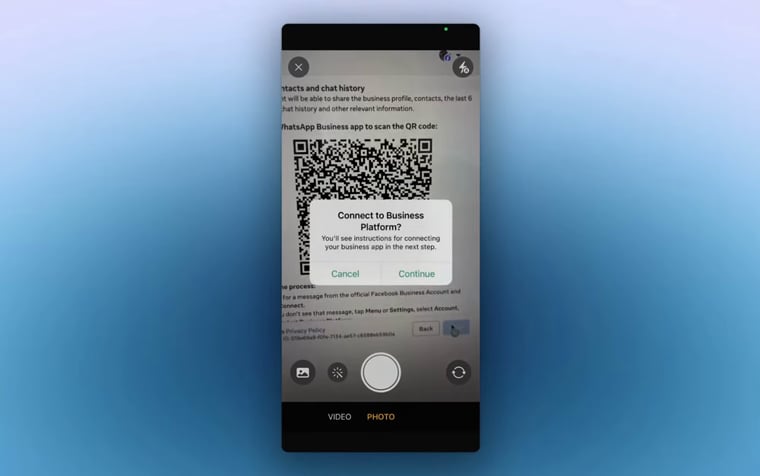
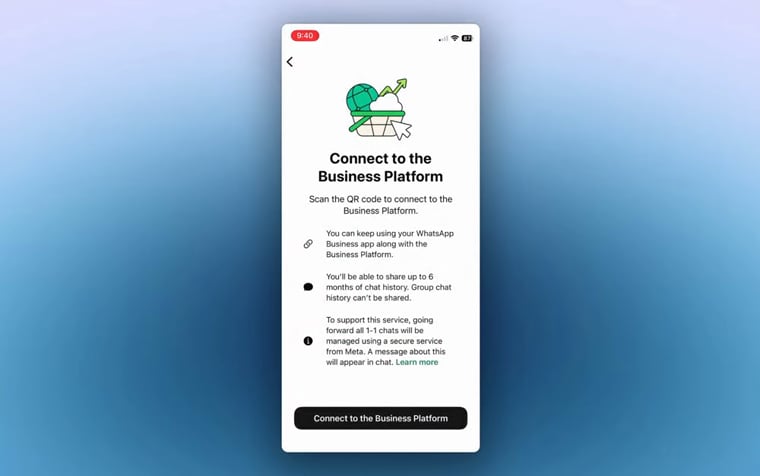
When the QR code appears, keep the browser window open and open the WhatsApp Business App on your phone.
-
On your phone, tap Connect to the Business Platform in the WhatsApp Business App.
-
Use the WhatsApp Business App camera to scan the QR code shown by Meta.

-
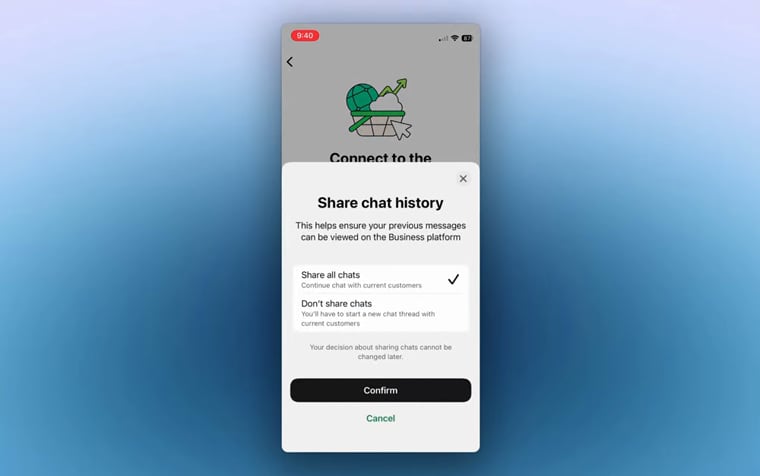
Choose whether to share chat history, then confirm your choice.
-
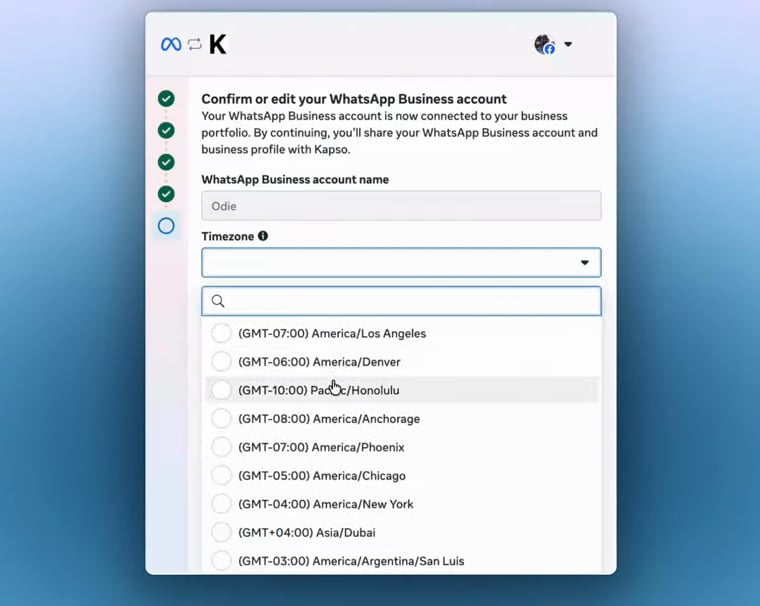
Back in Meta, on Confirm or edit your WhatsApp Business account, confirm the WhatsApp Business account name, select the account Timezone, and click Next.
-
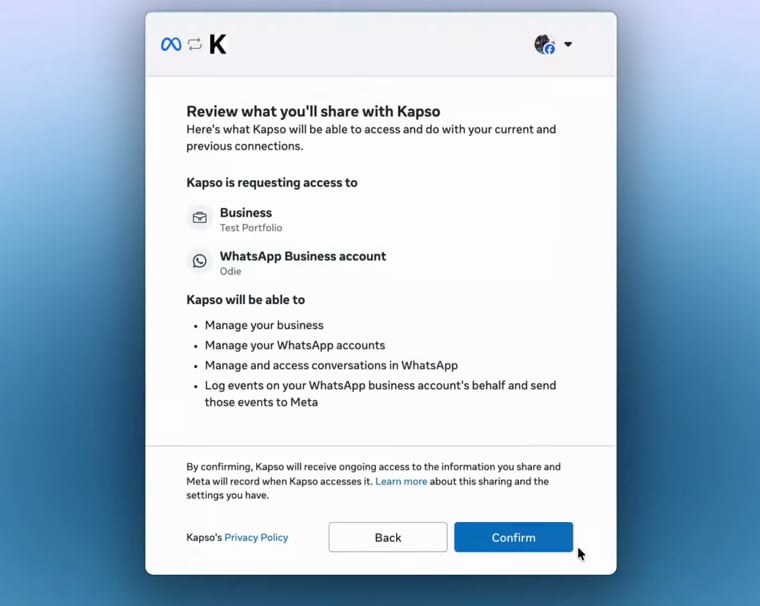
On Review what you’ll share with Kapso, review the requested access and click Confirm.
-
When Meta shows Your account is connected to Kapso, click Finish. This final step sends you back to Kapso so the connection can be completed.
Bring your own SIM
Use a phone number you already control as a dedicated Cloud API number. This path is for a number that can move fully to Kapso’s API connection. It is not for keeping the same number active in the WhatsApp Business App. Before using this option:- keep the SIM, phone line, or landline available during setup
- use a number you can verify by SMS or voice call
- make sure the number is not already connected to another Kapso project
- remove the number from previous providers or WhatsApp Business App registrations before retrying
- Go to Connected numbers → Connect new number
- Select Bring your own SIM
- Click through to open Meta embedded signup
-
Log in with the Facebook account that has access to your business. On Seamlessly connect your account to Kapso, review what Kapso will be able to do and click Continue.
-
On Select the business assets to share with Kapso, choose the Business portfolio for the business that owns this phone number.
-
Choose an existing WhatsApp Business account, or create one if Meta asks you to.
-
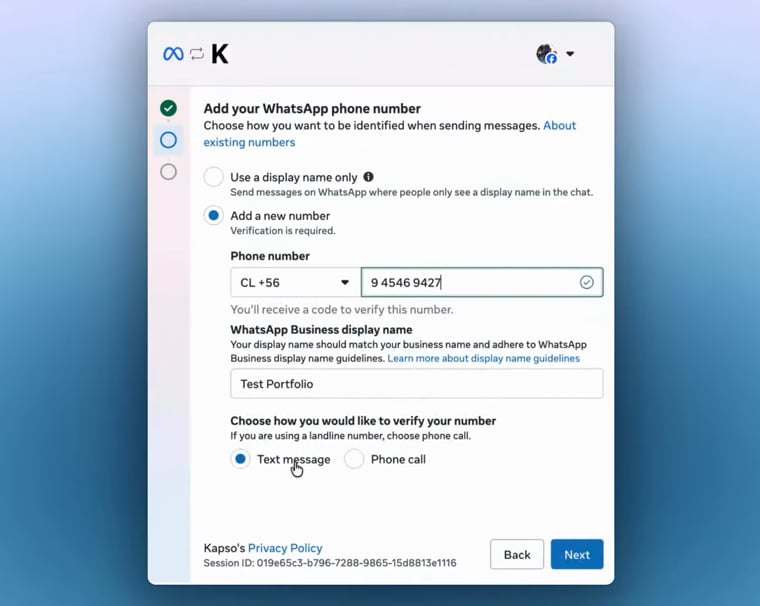
On Add your WhatsApp phone number, do not choose Use a display name only. Choose Add a new number.

-
Select the country code, enter the phone number you want Kapso to use, enter the WhatsApp Business display name, choose Text message or Phone call, and click Next.
-
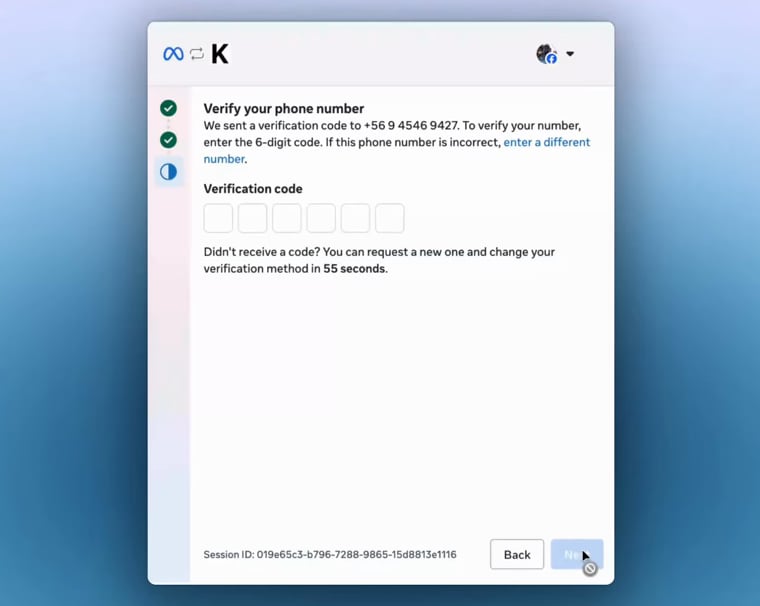
On Verify your phone number, enter the 6-digit verification code from Meta and click Next.
-
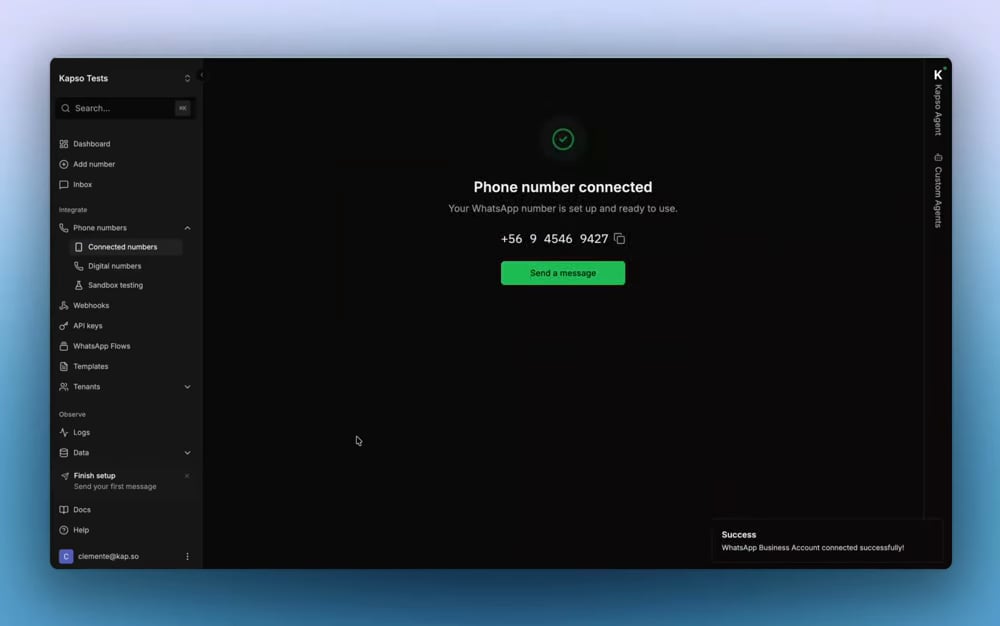
When Meta shows Your account is connected to Kapso, click Finish. This final step sends you back to Kapso so the connection can be completed.

If the popup doesn’t load
Disable ad blockers and privacy extensions. They block Meta’s SDK. Try Chrome or Firefox if Safari isn’t working.Why to avoid Display name only
In all of the signup flows in Meta you might find a Display name only option. If you choose it, you may complete Meta signup but end up with a limited Meta-managed number instead of the intended production number. Consequences:- The connected number may not be the Kapso-provided number, BSP-provided number, project-pool number, or SIM number you meant to connect.
- These limited Meta-managed numbers can stop working after about 5 messages and ask for display-name approval before you can keep using them.
- Display-name approval can take a long time, and Meta may defer the decision. While the decision is pending or deferred, you may be left unable to use the number.
- You may need to delete or disconnect that WhatsApp profile and restart onboarding through the correct Kapso flow.
Need help? In Kapso, go to the sidebar, click ‘Help’ and select ‘Support’